Windows 11 is there! And you might have already. This first article will discuss how to prepare and install Windows 11 on your device. If you want to know what things look great on Windows 11, I recommend you read my previous article. So without further ado. Let's get started
Tips 1 – Is your machine supported by Windows 11?
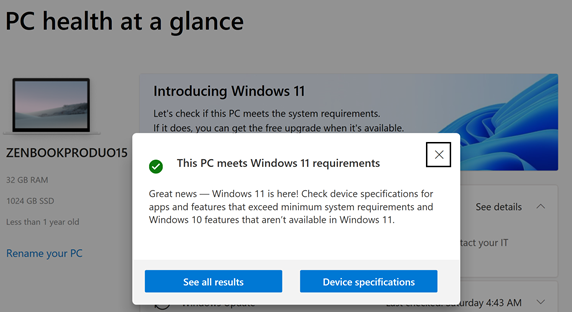
If you are in doubt that your machine is supported in Windows 11. You can download PC Check health
After the installation, you can click Check Now. And the result is here. You can keep the PC Health app for later use. If you were wondering why your PC is not supported, please see this list Windows 11 Specs and System Requirements | Microsoft

Tips 2 – Upgrading Your Windows 10 Now
One known bug (October 2021) is you can't upgrade Windows 11 edition after you upgrade from Windows 10 to Windows 11. It means.
- If you want to use Windows 11 Pro, you might consider this path Windows 10 Home – Windows 10 Pro – Windows 11 Pro
- If you want to keep your OEM license from your notebook manufacturer, you don't need to do anything. Windows 10 Pro will get Windows 11 Pro without further notice
- You can change the product key later when you have a higher license later

Tips 3 – Keeping Your Old License Key
The license key from Windows 10 is worked in Windows 11. So you can use an old key from Windows 10. The valid keys are:
- Windows 10 Education
- Windows 10 Education N
- Windows 10 Pro
- Windows 10 Pro N
- Windows 10 Enterprise
- Windows 10 Home
- Windows 10 Home N
Tips 4 – Choosing the Right Installation Media
You will have three options to install Windows 11. The options are:
- Windows 11 Installation assistant. Step-by-Step and user-friendly installation model. I recommend you use this if you want simple and easy installation
- Windows 11 Bootable Media. This will create DVD or USB bootable. I recommend you use this if you want to install it on a non-OS PC or brand-new PC
- Windows 11 ISO file. This will download the ISO for you. I recommend you to use this if you are in a disconnected environment and want to upgrade from Windows 10.
You can download the three options here Download Windows 11 (microsoft.com)
Tips 5 – It's a good time to refresh
If you have already synced your file in OneDrive, I recommend you start with a clean installation. This will make sure you can feel the best performance of windows 11. But if you want quick and fast preparation of Windows 11, you can choose to keep files and settings. I have two laptops one laptop use clean installation, and the second one uses an upgrade. I got the fact that clean installation only makes 15% - 20% installation faster. It might be because, in Fresh installation, you still need to erase the existing content, and it will be slower than the fresh installation if you do secure-erase. In conclusion:
That's it! Happy upgrading!